Downloading kid’s movies made easy!

I have an Apple TV and for those of you who haven’t heard of one it is NOT actually a TV.  It’s a small box that sits beneath my TV and wirelessly connects to my laptop, so I can access all the content I have in ITunes via my TV; movies, music and photos.

I was sent a couple of promo-codes to download Hop and The Adjustment Bureau.  If you’re not familiar with downloading movies via ITunes it’s dead easy.  Simply go to the ITunes store, search for your movie, you can choose whether to rent or buy, confirm your security details and voilà it will start to download (note: depending on speed of connection this can take a while).  It’s really no different from downloading music.  I tend to purchase the movies for my daughter as she watches them over and over.   However, my husband and I don’t tend to watch movies ourselves more than once so we just rent them.

If you don’t have an Apple TV you can also download movies via your PC or MAC, Iphone, Ipad or games consoles and watch anywhere.  I wish I would have downloaded a few movies for our epic flight to Canada in the summer!

I no longer have a lounge scattered with DVDs, in the wrong cases and that have been scratched beyond repair!  Plus, it also eliminates the frustration when queuing movies for my daughter as I’m not forced to watch the trailers and can opt to jump straight to the movie.

I can’t emphasize enough how easy it is!

Disclosure:  In return for this review I received a ‘Summer Wind-down Package’ which included HOP and The Adjustment Bureau, some film merchandise goody bags for my daughter and a bottle of wine and some chocolates for me.
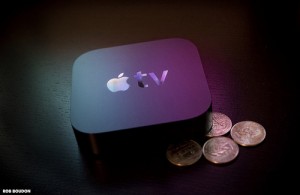


My New Gadget (Apple TV)

It all started when I wanted to find a way to get movies from my laptop to the TV without having to burn them onto DVD’s.  After a lot of conversation with the lovely Mark (@thelongmile), I decided to purchase an Apple TV and if you’re like me the first thing you need to know is that it’s not actually a TV.  It’s a small device that you connect to your TV which allows you to stream content from ITunes on your computer to your TV wirelessly.  Plus, you can also purchase and rent videos from ITunes and you can also make back up copies of DVDs you already own.

Prior to buying it I did do a lot of research and the reviews were very mixed.  The biggest complaint was the lack of content in the UK compared to what’s available to Apple TV users in the US.  However, I weighed up all the options, including gaming consoles as they will do a similar thing, and in the end felt that since I was already an Iphone and Ipod user and was familiar with ITunes the Apple TV would be the best for me.

The first stumbling block was when I realised that I needed to have a flat screen TV with HDMI ports on it.  We had an ancient telly so it was time to get a new one anyhow.  After a lot of research we settled on a 32″ Samsung Full HD LED TV.

After a quick trip to the local Apple Store I returned home with the New Apple TV (£99).  As usual, with most Apple product the design is sexy and it’s surprisingly small.  For the most part it was fairly straightforward to install, the only complaints I have are down to operator error.  Only two cables, one power lead and one HDMI cable.  So if, unlike me, you read the instructions you should be fine.

A few notes about installation

  • You will need to purchase the HDMI cable separately.
  • You may have to change the source using your remote.  As I had plugged the Apple TV into HDMI port 2 that’s the one I selected.
  • Have your wireless usernames and passwords to hand before you install it.  I did find the remote a bit fiddly.  My wireless password is 26 characters long with a combination of case sensitive letters and numbers, which was a nightmare to enter on the alphabetic keyboard using the ditty remote.   I just about gave up but got it after the umpteenth attempt and loads of swearing.

The good news is you should only ever have to do this once.  Plus, there is a free Iphone App that will turn your phone into a remote for the Apple TV

  • Make sure you have the latest version of ITunes as you need V10.1 or higher…I didn’t and it took me ages to work out why it wasn’t working.
  • You will also have to set up home sharing, both in ITunes and on the Apple TV.

In ITunes:

Advanced>turn on home sharing

Enter your Apple ID and Password

On Apple TV:

Settings>Computers and turn on home sharing.

I’ve now started to make back-up copies of all Madame’s DVDs.  It’s a bit of a long winded process, especially since I’m a PC user and have no idea what I’m doing, but I’m getting the hang of it.  I have to use two programmes (DVD Encrypter and Handbrake).  However, this may mean no more scratched DVDs!

I’ll keep you posted on how I get on. I’m off to watch Inception with hubby which I downloaded earlier.

How to Take Decent I-Phone Photos

I’m not a budding photographer.  I do have a digital camera and an i-phone, but I rarely remember to take my camera out and tend to rely on my i-phone. Unfortunately, the camera in the i-phone is inherently crap. The biggest problem is the slow shutter speed, which results in blurry photos.

I don’t want to be looking back at photos of Madame in 20 years and be gutted that they’re all blurry.  I would really like to be able to take decent photos with my i-phone but to date I haven’t had a lot of luck.  So, I’ve been doing a bit of research and this is what I found…..

How to take decent photos with an i-phone:

  • The best tip I found.  Every time I tried to take a photo I would press the button, phone would wobble, and I’d end up with a blurry photo.  I didn’t realise that it is actually releasing the button that takes the photo.  Hold your finger on the button and don’t let go until you are ready to take the photo.
  • Play Statues – shout freeze before you take a photo.  I-phones can’t cope with movement at all.  This is a lot easier said than done with a 3 year old
  • Hold the phone horizontally as it is much more stable
  • If you can, brace your arm on a table, wall etc.  Alternatively, hold your elbows firmly at your sides and take a deep breath.
  • Don’t bother taking distance photos as it just won’t cope and you’ll be disappointed
  • Ideally, the object you are focussing on should be no more or less than 2-12 feet away from you.
  • Bright rainy days are the best.  Luckily, this isn’t a problem in the UK
  • Try taking photos from unusual angle.
  • If you want to take a self portrait use the shiny Apple logo on the back of the photo as a mirror.  It will take a couple of goes to work it out.
  • Remember that colour is your friend.
  • Avoid bright white backgrounds, including the sky.  Neutral (natural) backgrounds work a lot better.  Too much white freaks it out.
  • Take loads of Photos, the beauty of digital photography.

Over the weekend, I tried to apply some of these techniques.  The results aren’t brilliant but an obvious improvement.

If all else fails, you can always tart up your photos with these apps.

1.) One of my favourites….Colour Splash.  Lets you quickly convert to black and white and then add a splash of colour.

2.  Picture Show – loads of weird and whacky things you can do with photos.

3.) Quad Camera – allows you to take continuous shots.

I hope this helped in some way.  Do you have any other hints/tips/suggestions?  I would be most grateful.

Fun with Photos!

I’ve been having a whale of a time playing with Colour Splash on my Iphone. I’m a rubbish photographer so I love anything that can help me tart up my photos. I think it cost £1.19. Basically, upload a photo, it turns it to black and white and with a stroke of your finger add a touch of colour….it’s so easy and weirdly therapeutic. I loved colouring in as a kid. Click here for a review and tutorial.

A huge thank you to @robsteadman for introducing me to it. What do you think? P.S.  this is not a sponsored post in anyway.

Have fun!