How to create a Custom 404 using Thesis

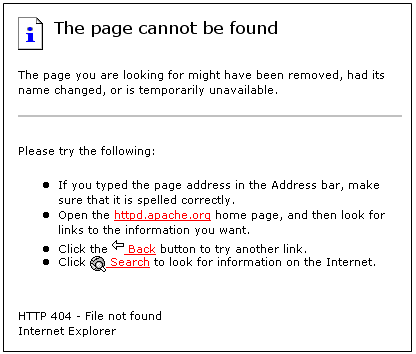
What’s the first thing you do when you see one of these?  If you’re like me you close the page and head back to Google and try again. 

404 Error Page

This is a really important opportunity for bloggers to gain a new reader, but you only have a few seconds to capture their attention.  So why not create a custom Page Not Found (404) and encourage them to stick around.

How to create a customized 404

Recently, I went to an SEO Academy organised by The Tots 100 and led by David from Distilled UK.  We spoke about 404 error pages.  They won’t hurt your site, but can affect your bounce rate (e.g. how quickly people leave).  404s can happen if you delete or move content around or if someone else incorrectly links to your blog.  If it’s an error on your behalf then you can always try and fix it.  If it’s an incoming link from another website/blog you can contact their webmaster and ask them to update the link or you can redirect them to your custom 404 page.  I will go into redirecting in more detail in another post as this is going to be a long one.

How to find the error pages

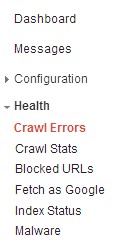
To find a list of your 404 errors, you will need to log into your Google Webmaster Tools > Your Blog>Health>Crawl Errors>

Crawl Errors

Click on the Not found Errors

Not Found

A list will appear at the bottom of the page.  Click on one of the links>Then linked from and it will show you where the link is coming from.

Webmaster Tools

How to Create The Customised 404 Error Page

I followed the following tutorial from Deborah Ager.  It was incredibly useful and this is where you should start as well.  However, there is a few things you should note.

  1. The plugin she refers to is no longer called Thesis Open Hook but is now Open Hook by Rick Beckman if you have trouble finding it.  I did!
  2. As the plug in has been updated, so have a few of the screens.  Below are screen shots of exactly how I set mine out.

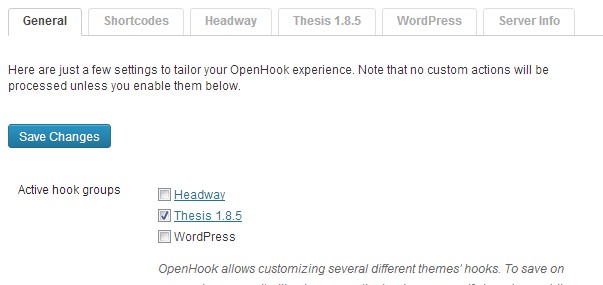
a.) On the general tab select thesis

Open Hook Settings


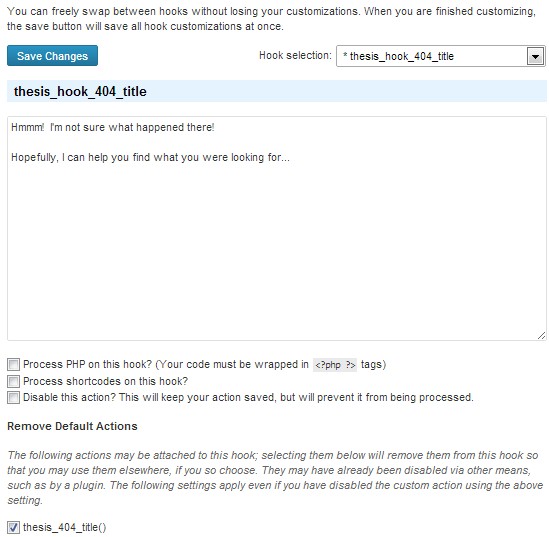
b.)  Select thesis_hook_404_title from the drop down box


404 Title Open Hook


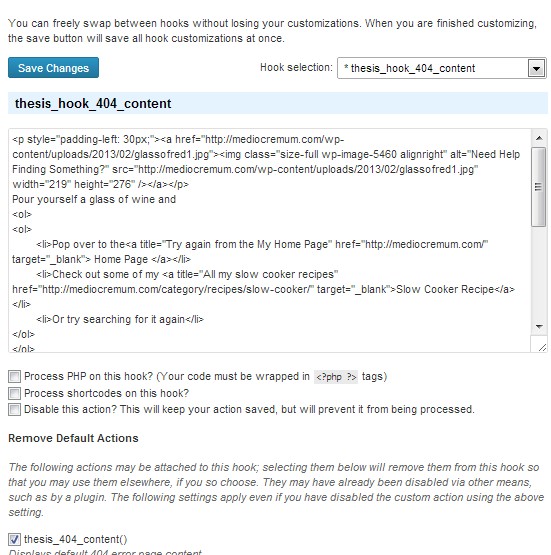
c.) Select thesis_hook_404_content from the drop down box


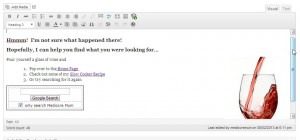
Paste your code in here


3.) Lastly, do not freak out if you can’t write code.  Neither can I, but I can copy and paste.  Always remember that you can use wordpress to set up your page, just like you’d normally set out a blog post in the normal Visual Tab adding text and images, aligning, formatting etc.  Just remember to save as a draft and not publish it.

How to write HTML Code

But then remember if you click on the Text Tab you will see all of the code.  Again, do not panic, just copy it.  Then head back over to the plug in settings and paste.

Writing HTML Code Using WordPress


So how did you get on??  Did it work.  Do let me know if I missed anything.

Now it’s time to redirect people to your fancy smancy new error page.
Top 10 WordPress Plugins for Parent Bloggers

I’ve been blogging for over a year now and have learned shed loads. I’m just above a beginner but not quite hit the novice stage yet. I thought I would jot down a few of the things that I’ve learned along the way and share them with you. Hopefully it’ll save you a bit of time and headache. Happy Blogging! Thanks to those of you who may have recommended these to me along the way.

Here are My Top 10 WordPress Plugins:

  1. Akismet: a must have spam filter, it catches the majority of those pesky spam comments.
  2. Google XML Sitemaps: I didn’t know that you had to submit site maps to Google, Bing, Ask, Yahoo etc. I found a much more convoluted way of doing it and then found this little plug in which automatically submits your site map for you. Genius!
  3. WordPress.com Stats: Obsessed with your stats? You need to have an API Key from a wordpress.com blog. However, once you’ve set it up you’ll have concise at a glance stats such as Daily Visits, Top Posts, Top Searches and Most Active Posts.
  4. Google Analyticator: is another must have plug in for the stats obsessed, which generates detailed statistics about your visitors.
  5. WP Database Backup: if you’re like me, I’m dreadful at backing up my blog. This little plugin does it for you in case the unimaginable happens. I’ve configured mine to email me a backup once a week.
  6. Fast Secure Contact Form: allows visitors to contact you without giving your personal details.
  7. Sexy Book Marks: A great way to get your readers to submit your articles to numerous social bookmarking sites (e.g Digg, Delicious, Stumble Upon)

8.  Link Within: highlights other posts on your blog with a thumbnail, encouraging your readers to stick around for a bit longer which is all good for your bounce rate.

9. Tweetmeme Retweet Button: Adds a button which easily lets you and your readers retweet your blog posts

10.  WP Social Blogroll – allows you to tart up your blog roll, including titles of most recent posts and when it was last updated.

Do you have any others you would recommend?  Please do pop them in the comments section.

Backing Up Your WordPress Blog for Beginners!

To make a long story short, I recently found a FATAL error in my CSS on my blog, I’d accidentally wondered in there by mistake.  However, before I could have a go at fixing it I had to take a back up of my blog, as there was a very good chance I’d ruin something, as I have very limited knowledge of HTML.

We all know we should back up our blogs regularly but most of us don’t.  I think I’d been putting it off because I didn’t know how to do it.  However, the thought of losing everything ranks up there with child abduction.

Well, I spent Saturday night learning how and thought I’d share with you what I did.  I’m Self-Hosted using WordPress.org.  Do bear in mind I’m not technical in the least, so if you are I would suggest looking away now.

There are two steps to backing up your blog.

  1. Backing up WordPress Database (post text, page text and users)
  2. Backing up Site Files (core installation, plug ins, themes, images and files)

Step 1

If you are using WordPress.org there is a plugin, WP DB Backup,  that you can use to backup up your database and you can set it up to take regular back ups and email them to you.  It’s really easy to use.  Some people stop at this stage and don’t back up the rest.

Step 2

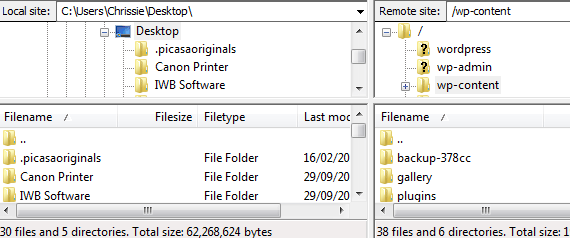
Is a little more complicated, but all you really need to do is take a copy of your content folder on the host server and place it on your machine.  It’s just a matter of locating the file and dragging and dropping it onto your desktop.  To do this you will need FTP access.  I had to ring my mate.  He suggested using Filezilla it’s a free downloadable FTP client.  You will also need your host address, username and password.  If you don’t have these I’m sure you can get them from your host.

First, install and configure Filezilla

Now locate, your WP Content folder on the server side (the right hand pane), then simply drag and drop it onto your desktop or you can select a folder on the left side and then drag it in there. Note: Mine took atleast 20 minutes copy.

Whilst I was writing this, I came across this site purporting Backing Up in 60s, which looks dead easy but once I read the comments on the post  I wasn’t convinced that it was taking a full back up.  I’d be grateful if you would tell me otherwise.

Customising Your Header

While I was trolling the internet looking for themes I came across SimplyWP and was quite taken with their style.  It’s not for everyone; I think  you’ll either love it or hate it.  They have a selection of free WP Themes that you can download or you can have them create a custom theme for you (£250 US).  I couldn’t afford or justify having a custom theme but they did offer to do a custom header for me ($30-$75 US).  I’m over the moon with the result and the service was excellent the whole way through.

I emailed them with the colours I liked, current fonts I was using and a vague idea of what I was hoping for.  Kathie, from SimplyWP, sent me off to istockphotos to choose some images that I would like to use.  She said it would take 2-3 days for the first draft.  By the end of the 2nd day I had the first draft and it only needed a few minor changes.  She also offered to upload it free of charge. Unfortunately, I didn’t have the host information.  However, she did send me a good set of instructions so I could upload it myself.  But, too be honest, I had a friend (@adrianburns) do it as it was a bit beyond me.

The only thing they ask (don’t demand) is that you give them credit in the footer.  I’m more than happy to do this once I work out how to do it! :-)

I wouldn’t hesitate to recommend Andrew and Kathie at SimplyWP.

I’m in the process of trying to wangle you guys a discount and will let you know how I get on.  Just for the record I don’t receive any kick backs for recommending them.  I just like to spread the word when I experience good service.

Great News Kathie and Andrew from SimplyWP will give a 10% discount to people who come via  mediocremum.com. Just tell them I sent you.

My Journey from WordPress,com to WordPress.org

Registering a Domain Name and Renting Server Space

Exporting Your Blog

Choosing a Theme

Redirecting Traffic (TBA)

Plugins (TBA)

Technorati (TBA)