Gotta love a book that inspires a bit of impromptu crafting! Tamara Small and the Monsters’s Ball by Giles Paley-Phillips, is a delightful story with amazing illustrations.
Madame’s Monster!
Disclosure: We received the book complimentary
UK Parent and Lifestyle Blog – Travel | Kids Tech | Slow Cooking
We were inspired by the lovely Maggie from Red Ted Art to try our hand at decorating Easter Eggs. It was incredibly easy and effective.
However, within 5 minutes of finishing decorating them my daughter has broken 8 out of the 12 eggs, playing Easter Bunny. Oh well, the fun was in decorating them.
We ended up adding more food colouring as the colours weren’t vibrant enough. The longer you leave them in the dye the darker they get.
To decorate
Once the eggs have dried, apply a selection of stickers. I found a selection from Wilkinson’s in the stationery aisle, over 1200 for only £1.50.
Happy Easter!
 I wish I could take credit for these lovely Fingerprint Valentines Day cards but once again it was thanks to a Google Image Search.
My daughter is 4 and managed it and I think you could do it with young babes as well but you’d have to position their fingers.
You will need:
How to do it:
1) Have your children create a couple of sheets of the heart fingerprints so you have a few good ones to choose from
2) Cut and fold the card
3) Once the prints dry carefully tear them out. If you’re kids are old enough they could probably do this bit themselves.
4) Use the Prit Stick to glue the fingerprint hearts onto front of card.
5) Personalise them, I used a silver pen
Happy Valentine’s Day!
 Whenever I need inspiration for crafting, I always turn to my mate Maggie from Redtedart.com and once again she has come through trumps or should I say hearts!
These Love Rocks caught my eye as they are so simple and required very little in terms of materials. I think they’re going to make perfect Valentine’s Day gifts. However, posting to Canada or South Africa is not an option.
You will need
Method
Happy Valentine’s Day!
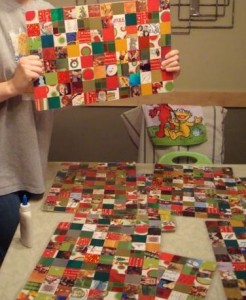
 I was looking for ideas of what to do with my old Christmas cards. In the past, I’ve used them to create gift tags, thank you postcards but mostly end up burning or recycling them. However, after a quick troll on the internet I found these wonderful placemats. They were very easy to make and took less than 30 minutes.
You’ll need:
How to:
I used a guillotine to cut the backs off of the cards and then I cut the cards into squares 4cm x 4cm. I’m sure you could vary this, possibly larger for younger children.
I also included a few photos of my daughter so we can see how much she has changed from year to year.
We used double sided sticky tape. You could use glue but I think my 4 year old would have lost interest quickly.
Getting them a bit square was challenging but not a problem as you can trim the wonkey ends when you’re done.
I now just need to find someone with a laminator.
I’m hoping to turn this into a small tradition, making one a year, so, in a few years time we may have a full set!